


There is an increasing trend in the industry towards self tape submissions for a first round of casting, or even as a substitute for in the room auditions. Here are a few pointers for how to improve your chances of being called in for a face to face audition.
—
While a director, or casting director, can sometimes look past technical flaws in the self tape (if the performance is strong enough) there is no reason not to record your tape in the most professional way possible.
I have listed many problems that crop up in self tape auditions below. I have encountered all of them multiple times, but the good news is most of them are easily fixed and require only a small amount of time and effort to correct. I have on occasion called actors in for recalls from tapes that were flawed in some way, but it can be distracting trying to gauge the quality of a performance when there is a glaring technical issue or the shot is framed badly, or the offscreen reader is interfering in some way.
The truth is a professionally shot self tape does predispose a viewer to take the actor submitting more seriously. I’m not talking about high end lighting and sound or cameras that cost thousands, I just mean well lit, properly framed and filmed footage with good sound quality.
Basically you want to give yourself the best possible shot at getting a recall or getting the job, so read on to see how you can put your best foot forward. This is an in-depth guide to self taping so I have broken it into two parts. I’ll talk about self taping under several headings, and give some general thoughts at the end.
THE CAMERA
These days everyone has access to a camera, whether it is your phone, your laptop or a video camera. The quality of camera you have access to will not determine your success or otherwise, but there are a few considerations to bear in mind.
Firstly figure out how to stabilise your camera. If it is a video camera or you are using your phone invest in a tripod. You can get them very cheaply in electronics or phone shops. If you have a spare pair of hands then a friend can hold the camera to film the audition, as long as they are not the same person who is reading in opposite you. If you are using a laptop to record you will need a stable surface at eye level.
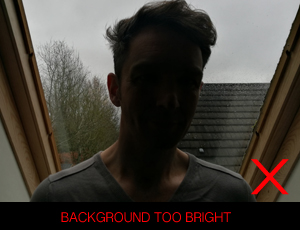
Another consideration when setting up the camera is the brightness of the shot. Expose correctly by choosing a neutral background that is not excessively bright, to allow your camera to balance the light correctly. So never position yourself in front of a bright window or you will be silhouetted.
Another issue is focus. Usually autofocus is fine, but in lower light conditions some cameras can have trouble keeping a subject in focus. In this case you will have to add more light or switch to manual focus and set the focus so that it remains fixed on you for the duration of the scene.
Avoid too much movement forwards or backwards. If you lean towards the camera too much you can go out of focus, similarly if you lean back too far.
FRAMING
The first thing to get right is the orientation of your shot. Because of Instagram Stories many people are used to using their phones in portrait mode to record video, but the standard in the film industry is to shoot video in landscape mode. See the difference here:
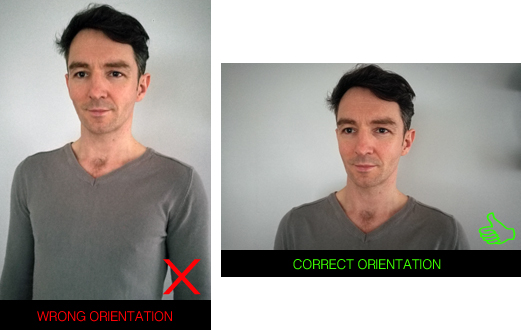
Sending in a self tape in portrait orientation will make you look less experienced and less aware of the industry standard. It also makes it very difficult for the viewer to gauge your performance.
Always shoot your self tapes in landscape orientation.
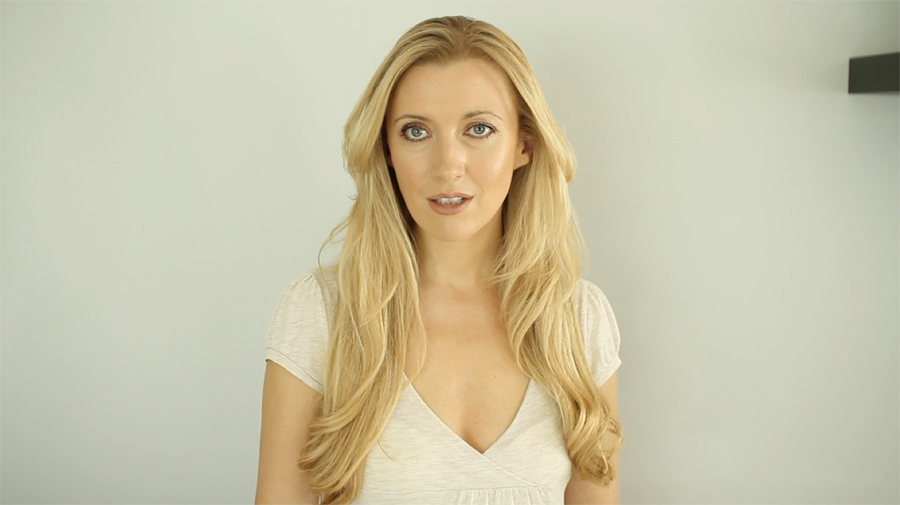
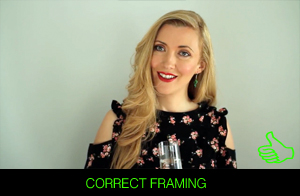
You should fill most of the screen in your self tape – place yourself in the centre of the shot or just off to one side, with head and shoulders visible on screen. Keep the camera level with your eyes.
Your eye-line, or focus should be just to one side or other of the camera (not straight into the lens). This is necessary so that we can see your eyes and read the performance. If your character is speaking to multiple characters place them on either side of the camera, regardless of where they would be in the actual scenario.
The most common mistake I see people making is having far too much headroom, or space between the top of the actor’s head and the top of the image, like this:
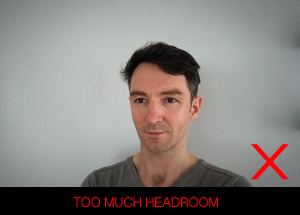
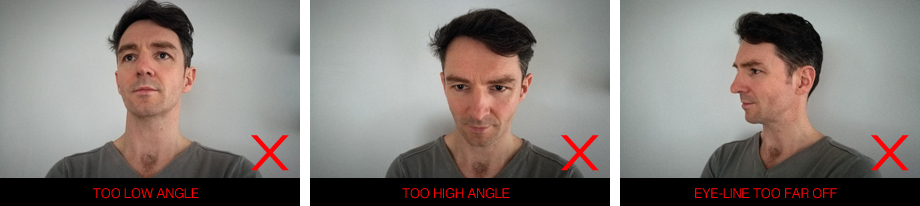
A low angle can be unflattering and a high angle can make you look weak. Don’t move around too much in the frame. If you look too far off camera we will lose your eyes, and your performance will suffer. For the same reason avoid looking down for long spells, even to have a contemplative moment in character. We can get nothing from the top of your head.
LIGHT
This is one area neglected by a lot of actors who submit tapes online. It is vital you are well lit and properly exposed in order for a casting director or director to be able to see your performance.
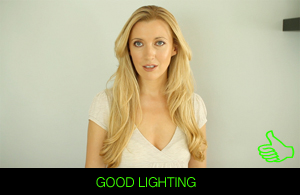
If you have access to a studio with lights great, but it is not essential to have a professional lighting set up. What you do need is a good strong source of light facing you (slightly off to one side) that is balanced out by a secondary source of light (or reflected light) on the opposite side.
The simplest way to achieve this is to sit with a bright window in front of you just to your left or right with light reflected back from the other side by white walls or a white surface.
You can also use household lamps to either side if there isn’t sufficient daylight, but try to avoid using naked bulbs or overhead spotlights, as they create very harsh shadows.
THE READER
The right scene partner can make or break an audition. They need to be discreet enough not to interfere with your performance, but animated enough so that they don’t leech the scene of all life.
If possible your scene partner should be the correct gender for the character they are reading in.
The best setup is to have the reader place their chair the same distance behind the camera as you are in front of it and just to one side or other so your eye-line is close to the lens. They can trigger the record button, then move into position to allow you to begin the scene.
Some notes for readers:
- Don’t do funny voices – This includes accents, and trying to make yourself sound like the opposite gender by pitching your voice up or down. It is very distracting and can result in a dramatic scene coming across unintentionally comic.
- Don’t overact – You are not auditioning! I have never heard of a single instance where an actor was brought in to audition because they were seen reading opposite another actor in a self tape. It doesn’t happen, so don’t sabotage the actor who is genuinely in the running for a part by over egging it. Keep your delivery of the lines subtle.
- Don’t pause – There’s nothing worse when watching self tapes than seeing an actor left hanging out to dry by the person reading opposite them because they have decided to give themselves a dramatic pause off camera. Just don’t do it, it kills the momentum of the scene and leaves the auditioning actor looking uncomfortable while you indulge yourself. Read the lines naturally, not speeding through them, but avoid leaving long unnecessary gaps.
- Don’t get in shot – Again, you are not auditioning! Don’t place yourself in front of the camera, even if your back is to us. It’s very distracting and not the typical format for a self tape. Let the actor who is auditioning hold all of our attention by allowing them to fill the frame.
- Don’t sit too close to camera – This is just to reiterate the point above. If you sit closer to camera than the auditioning actor your voice will be much louder on the tape, unless you are using separate microphones.
In certain circumstances it might be impossible to find someone to read opposite you. This can be overcome, but it will take a bit of work, either technically or with your imagination. It is important to make sure the casting director or director is aware that you have no scene partner in advance.
Broadly you have three options when sending in a self tape with no partner to read opposite you:
- Do the scene alone, with no voice filling in the other lines – I have seen many self tapes done this way and have brought actors in to audition from tapes where this was the case. This approach requires an active imagination from the auditioning actor. You will have to imagine the responses and reactions from the other character in the scene and know their lines as well as yours.
- Record the other character’s lines yourself and play them back during your tape – Again this is quite common and I have brought actors in to audition from tapes recorded using this technique. The key here is timing. You will have to allow yourself enough time to get your lines out in the original recording. The danger is that you get the timing wrong and either end up interrupting yourself or leaving long pauses where they shouldn’t be. You can also have another person record the lines and email them to you and perform the scene in the same manner.
- Have someone read the other character’s lines online via Skype or a similar setup – This is becoming far more common, and to my mind is the best solution to the problem of not having a reader, if it is available to you. You have the other person read the lines remotely and have their voice come through a set of speakers so that they are audible. The benefit of this solution is that they are reacting to you in real time, and as long as their voice is audible enough it shouldn’t make a huge difference to the viewer. You will still have to use your imagination to place them in the room at an appropriate eye-line, but at least you can focus on the performance and not have to worry about getting your timing right.
That’s it for now. Check back next week for Part II…
© Graham Cantwell, Film Venture 2019